Back to TheWorxHub for Senior Living Main Menu
Trip Billing Settings
TheWorxHub allows your transportation department to bill passengers in a variety of ways. Whether you bill by mileage, time, fixed cost or a combination, setting up your billing options is quick and easy.
- Click on the Settings tab, then select the Transportation tab.
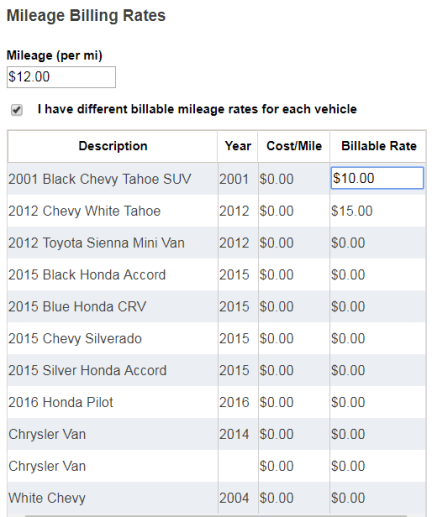
Mileage Based
Mileage based billing should be used if your facility bills trips based on the total distance traveled. TheWorxHub automatically calculates the distance of each trip using GPS data. When a trip gets marked as billable, the distance is used to calculate the total bill for each household on the trip. *Note: If you are only using mileage based billing be sure to put a value of zero in the Drive time (per hr) and the Wait time (per hr) fields in the Time Based Billing Rates section.
- In the Billings section, enter the amount your organization charges per mile in the Mileage (per mi) field.
- If your rates are different depending on what vehicle is used for a trip, check the I have different billable mileage rates for each vehicle box. *Note: If you check this box you must enter a rate for each vehicle by clicking into the Billable Rate field.
Time Based
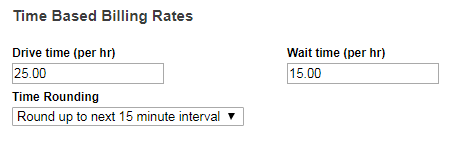
Time based billing should be used if your organization bills trips based on the total trip time. TheWorxHub automatically calculates the total drive time for each trip using GPS data. If the driver waits, the wait time can be included, excluded, or charged at a different rate. When a trip gets marked as billable, the times are combined and used to calculate the total bill for each household on the trip. *Note: If you are only using time based billing be sure to put a value of zero in the Mileage (per mi) field in the Mileage Billing Rates section.
- In the Billing section, enter the amount your organization will charge per hour in the Drive time (per hr) field.
- If you charge a different amount per hour while the driver is waiting, enter that amount in the Wait time (per hr) field.
- Time Rounding - Rarely is it practical to charge for the precise number of minutes on a bill. Instead, select one of the following rounding methods to use when calculating the bill:
- None (use entered time)
- Round up to next 15 minute interval
- Round up to next 30 minute interval
- Round up to next hour
Fixed Based
In addition to billing passengers by total time or total distance, TheWorxHub also allows a destination to have fixed cost. A common fixed rate example is dropping off and/or picking up a passenger at the airport. In order to have a fixed cost for a trip, the trip must be saved as a favorite destination. *Note: Entering a fixed rate for a destination will override any other charges if a trip with that destination is marked as billable.
- In the Favorite Destinations section, click in the Fixed Bill field next to the destination that requires a fixed bill rate.
- Enter the Fixed Bill Rate in the pop-up window that appears.
- Click Save.
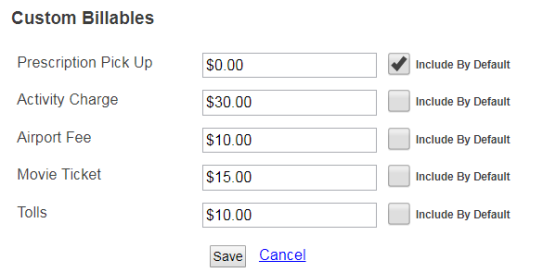
Custom Billables
TheWorxHub allows you to bill by total time, mileage, and fixed rates; it also allows you to have custom billable items. The most common example of a custom billable item is an event ticket for an organized special event such as a baseball game.
Adding a Custom Billable
- Click on the Settings tab, then select the Pick Lists tab.
- From the Pick List section menu, select Chargeback Rate Type.
- Select the Transportation option.
- To add a custom billable, click on the New Pick List Item button.
- Click into the Name field and enter the chargeback rate type name in the list.
- Click Save Changes to this Pick List button.
Entering Prices for Custom Billables
- Click on the Settings tab, then select the Transportation tab.
- In the Billings section, enter the price for each of your custom billables. *Note: If the billable is for an item that changes price, such as an event ticket, enter zero for the price.
- If you would like for the custom billable to appear as a charge on all trips marked as billable, check the Include by Default box.
- Click Save.